
Send documents to be signed with Bigle's secure, legal and binding electronic signature.
Our e-Signature:
- Is legal and secure, and complies with the regulations of the European Union (Regulation (EU) No. 910/2014 “EIDAS”), the United States of America (ESIGN Act), and other countries in the world.
- Is traceable as the data is stored securely and if any changes or disputes arise, they can be easily detected.
- All information is encrypted and can only be accessed by users with the proper permissions.
e-Signature types
Depending on how the signature is made:
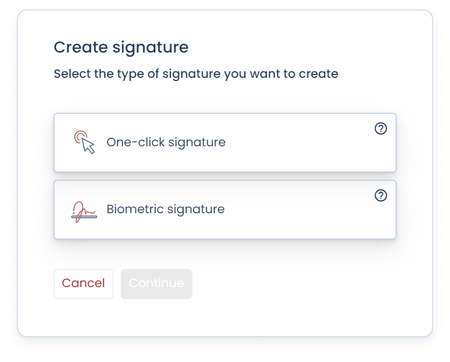
1. Biometric electronic signature
The biometric electronic signature stores unique data of the signer, such as the pressure used on the device, the acceleration and the speed of the signature (all of it attached to the signature).
- This type of e-signature is recommended for advanced cases that require a high level of trust and control. Through biometrics, the signer can be identified.
2. One-click signature
The one-click electronic signature offers a much faster and easier way to sign. Users can sign documents with a single click, eliminating the need to place the signature box on the document and perform the signature drawing, but maintaining the same legal validity.
- It is fast and intuitive enough to help you sign documents on the go; for example, terms and conditions, privacy policies, budgets or sales propositions.
Depending on the order of the signature:
For both types of signature (biometric electronic signature or one-click signature), it is possible to choose between sequential and parallel signatures. This choice determines the order in which the signers are notified and how the document is signed.
- Parallel signing allows all signers to receive and sign the document at the same time.
- Sequential signing allows you to choose the order in which the signers receive the document. Until the first designated signer has signed, the second signer cannot sign, and so on.
How to carry out the signature process
Before you begin, in order to start the signature process, make sure that there is no other process in progress.
1. Start the signature process. You can do it in two different ways:
A) Go to the document to be signed and select ‘Add step’ and ‘Signature’ from the left side panel. Next, choose the version of the document you wish to use in the signing process and click ‘Select’.

If, at this point, you wish to change the version of the document to be used in the signing process, you can do so by clicking on the ‘Change version’ button at the top left of the document environment.
B) With the shortcut to the signature found in the Documents tab, by clicking on Create document and choosing the New signature process quick action, you can directly start a signature process, uploading an external document.


When a signature process is started, a task assigned to the creator will be automatically created. Learn more about tasks in this article.
Additional configuration options
- If you have a signature provider other than Bigle Sign integrated with Bigle, after starting the signature process, a window will open where you can select the desired provider.

- If you have configured the option to attach documents already signed with another external provider, this will be displayed in the same window.
To configure these two additional features, please contact support@biglelegal.com.
2. Once you have started the process, select the type of signature: one-click or biometric.
- Once selected, choose the language in which you want signature notifications to be displayed to signers:

3. Choose the order of the signature, parallel or sequential:

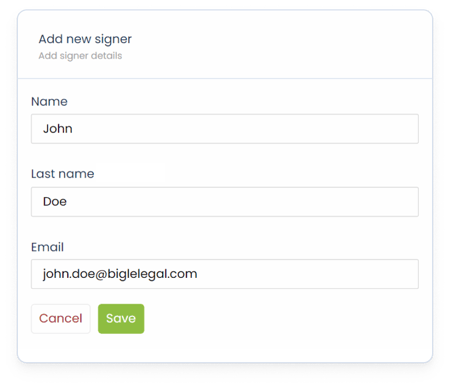
4. Add the signers, along with their data (name, last name and email).
- Learn in this article how to make each signer automatically populate with their names, last names and email addresses thanks to the information entered in the document form.
- Then, only if you have chosen the biometric signature (since the one-click signature does not need the signature drawing), you must place each signature box in the document. To do this, click on Position the signature, drag the box and press the pin icon to fix it (you can press it again to unpin it and modify its position).
It is also possible to use tags in the template for the signature boxes to be automatically positioned in the document. We explain how to do it in this article.


As you can see in the images above, if you want the same person to sign in several places in the document, you can add as many signature boxes as necessary using the Add another signature button. If you want to add more signers, click on Create new signer card and repeat the process.
- If you have selected sequential signatures, it is time to choose the order of the signers. Remember that this step will determine the order in which the signers will receive the document to sign. Click and drag on the six dots to the left of each signer to move them forward or backwards in the sequence of signers.

When you have finished, click Send to sign.
5. In the next part of the process, you can edit the subject and text of the email that each of the signers will receive.

At the bottom right hand side of the page, above the Send to sign button, you can see how many signatures this process requires and how many signatures you have available (in case your plan does not come with unlimited signatures).
When everything is ready, click on Send to sign. All signers will receive the email with a link to the document from which they can accept the conditions and sign.
5.1. Edit the signer
You can edit the signer's information (their first name, last name, and email address) once the document has been sent for signature. To do so, click on the three dots to the right of the signer whose information you wish to edit and select ‘Edit signer’.

In the drop-down menu that appears, edit the information in the three boxes and click on ‘Send signature’. This will send a new email with a link to access the document and sign it.

Signature process information
Once the document has been sent to sign, you will access a screen with all the information related to the process:
- The status of the signature, the data of the signers and the possibility of sending a signature reminder:

The envelope icon next to each signatory will appear in green when each signatory has completed signing the document.

- You can download the document in this same section, when all parties have signed:

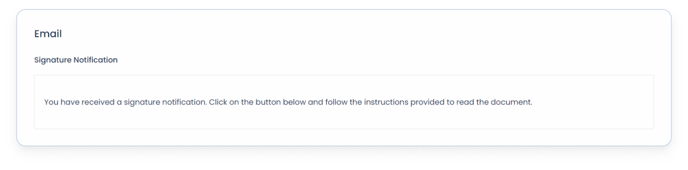
- Here it displays a copy of the email received by the signers:
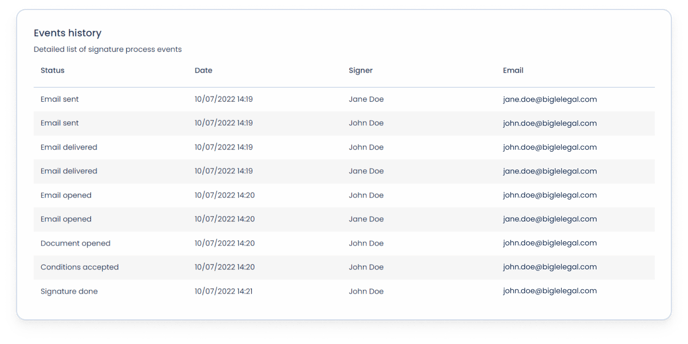
- The events history, in which all actions will be recorded: date and time in which the document was sent, it was delivered, it was opened, when the conditions were accepted and when it was signed by each signer:
Signature process options
To access the signature processes of a document, see its status and dates of creation and modification, select the document and, from the document processes panel on the left, you will be able to see all the signature processes carried out on the document, in chronological order, together with the rest of the processes carried out.

The processes are sorted according to the creation date, so that the most recently created ones will appear at the top of the list.
Options:
- If you click on the process, you will access its complete information.
- The Status column indicates the status of the signature process:
Statuses in progress of the signature process:
- Pending: the document has not been sent for signature yet. When the process is in this stage, you can still delete it without the need for the signers to be notified by clicking ‘Cancel signature’ at the top of the document environment.

- Sent to sign: The document has been sent to sign to all parties. If you do not want to continue with the process, you can cancel it. To do so, click on ‘Cancel Signature’ at the top right. It will be recorded that the process was initiated and cancelled, and all signers will be informed by email.

- Expiration of the process: The signature has an expiration limit that you can check before sending the document to sign, in the following box:

If you would like the signing process to have a longer or shorter expiration period, please contact the support team via chat or email at support@biglelegal.com
Finished statuses of the signature process:
- Cancelled: You have canceled the process after the document has been sent to sign. The signers have received an email informing them of the cancellation.
- Signed: The signature process has been successfully completed by all signers.
- Rejected: The signature process has ended because one of the parties has refused to sign the document.
If you want to start a new signature process for this document, click on “add step” and select “Signature”. Since there should only be one active signature process, make sure that the other processes have already finished and cancel the ones that are in progress.
You can quickly see the status of the most recent process of a document from the Documents tab, in the “Signature” column:

In this case, the status of the signature is a shortcut to the information screen of the signature process in question.