When we talk about option fields, we refer to:
Content of the article
1. Tags to set up the options: compound tags
1.1. Tags to condition text to a single choice or dropdown field
1.1.1. Conditioning text to a dropdown field through an options list
1.2. Tags to condition text to a multiple choice field
1.2.1. Adding automatic numbering to the options of a multiple choice field
2. Tag to show the selected value in a choice field: {value}
2.1. Tag to add connectors to the values of a multiple choice field: {JOIN}
2.2. Tag to add automatic numbering to the values of a multiple choice field: {numbering}
1. Tags to set up the options: compound tags
To configure each of the options in an option field, we will use compound tags. These are opening and closing tags which, in turn, are made up of two tags: the one for the field and the one for its options.
To configure them, we will first write the field tag, then an underscore (“_”) and, finally, the option tag.
As shown below, this configuration must follow the rules of the opening and closing tags (that is, both tags have to mark the start and end of the content that we want to be shown in the document).
{% raw %} Opening tag: {#field_option}
Closing tag: {/field_option}
1.1. Tags to condition text to a single choice or dropdown field
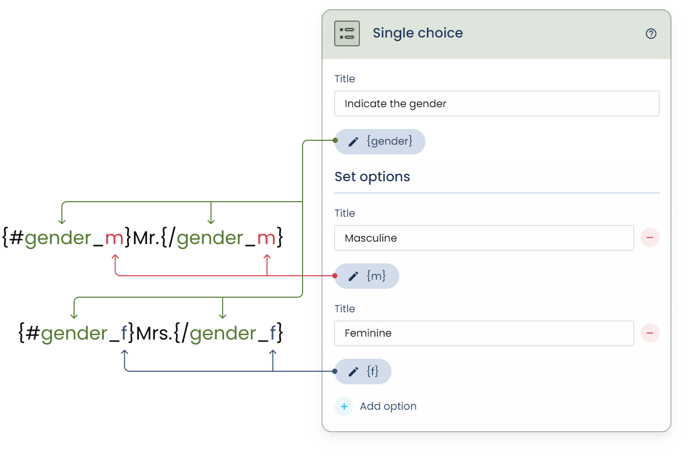
The configuration of the tags for the single choice and the dropdown fields (in this second case, when we choose to create them "individually" in the field options panel) is the same since only one option can be selected in both.
We will write the opening tag, the text of the option that should appear in the document and the closing tag. We will repeat the process for each of the possible options, without writing anything or leaving any of space between them, as shown below:
{#field_option1}Option 1{/field_option1}{#field_option2}Option 2{/field_option2}
For example:
{#gender_m}Mr.{/gender_m}{#gender_f}Mrs.{/gender_f}
1.1.1. Conditioning text to a dropdown field through an options list
In the case of the dropdown, in addition to creating the options "individually" as we have seen before, we can do it through the "listed" option.
This option is especially recommended in situations where we have to enter a large number of options, as it will help us add them in a much quicker and more efficient way.
If we choose "listed" in the field options panel, we must:
- Place the field tag in the place where we want the chosen option to appear, in the document template.
- Add all the options to choose, separated by a line break, in the box inside the field configuration panel, just below the “individually” and “listed” buttons.
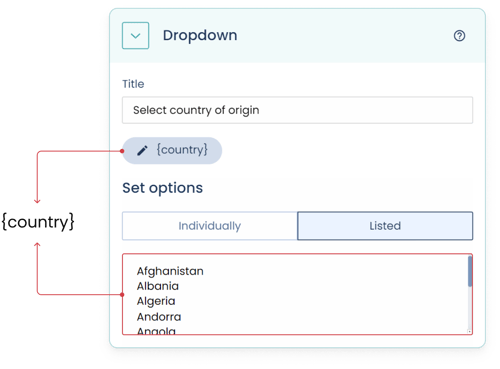
In the example of the previous image, the dropdown field is used to be able to choose the country of origin of a person. To do this, we have used “{country}” as the field tag, we have selected the “listed” option and we have entered the list of countries, separated by a line break, in the box of the field configuration panel.
To achieve a result like "Mary's country of origin is England.", we will place the field tag in the corresponding place in the template:
Mary's country of origin is {country}.
As we have seen, the “list” option allows the dropdown to work perfectly using only the field tag in the template.
However, the platform will automatically generate the individual tags for each option, which can be used to create its compound tag (following the instructions in the previous section) and be able to make personalized settings for each of the options -for example, conditioning a text to choosing an option-.
We can see the generated tags by clicking on “individually”: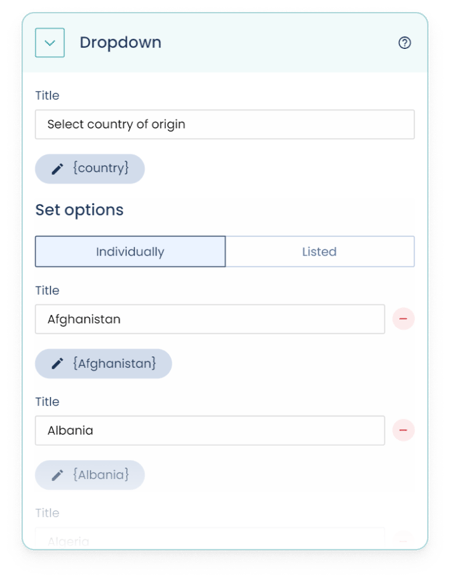
1.2. Tags to condition text to a multiple choice field
Setting up tags for multiple choice fields is very similar to that for single choice and dropdown fields.
However, in this type of field it is possible to select more than one option, so the positioning of the tags can cause the selected options to be displayed in one way or another in the final document.
When we want the options of the multiple choice field to appear one below the other, we will use the following configuration (with each of the possible options):
{#field_option1}option 1{/field_option1}{#field_option2}
option 2{/field_option2}{#field_option3}
option 3{/field_option3}
For example:
{#field_option1}“The disclosure or use of Information by the Recipient in violation of this agreement will be considered cause for compensation of damages.”{/field_option1}{#field_option2}
“Confidential Information, and all rights thereto that have been or will be disclosed to the Recipient, shall remain the property of the Discloser. The Recipient will not obtain any right, of any kind, over the information, nor any right to use it, except for the purpose of this agreement.”{/field_option2}{#field_option3}
“Confidential information may not be reproduced by any means or in any format by the Recipient without the express prior written authorization of the Discloser, except for those copies that the Recipient may need to make this agreement operational.”{/field_option3}
To structure the options, you may be interested in this article on spacing and line breaks.
1.2.1. Adding automatic numbering to the options of a multiple choice field
Frequently, when displaying a list of various options, we will need them to appear numbered.
We can combine the “Auto Numbering” tool found in text editors (such as the one on the platform or, for example, Microsoft Word) with the tag configuration for the field options that we have seen previously.
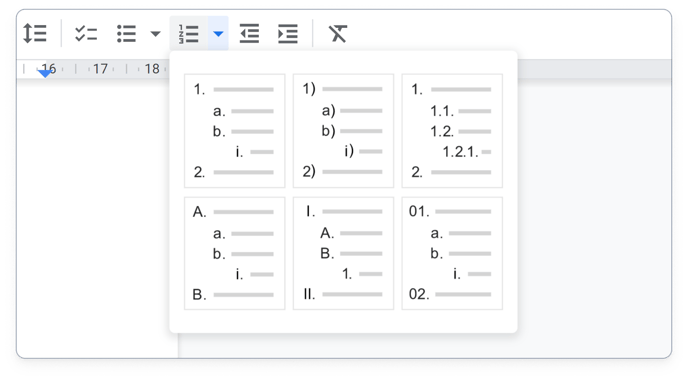
To get the options in the multiple choice fields to appear automatically numbered consecutively in the final document (regardless of which ones are selected), we will simply:
- Activate "Numbering" from an editor (either with the option of numbers, letters or Roman numerals) on the text paragraphs of all the possible options of the field.
- Add the option tags to each paragraph, enclosing their numbering.
The end result should be similar to the following:
{#field_option1}
- Option A{/field_option1}{#field_option2}
- Option B{/field_option2}{#field_option3}
- Option C{/field_option3}{#field_option4}
- Option D{/field_option4}{#field_option5}
- Option E{/field_option5}
Note that the opening tag of the first option is above the list, encompassing the number "1" of the list.
By selecting options A, C and E from the previous example, the final document would show:
- Option A
- Option C
- Option E
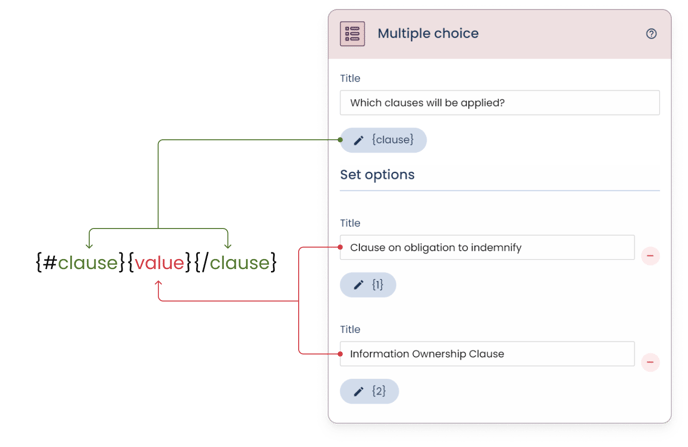
2. Tag to show the selected value in a choice field: {value}
The platform also offers the possibility of showing only the title of the selected options in the document. To achieve this result, instead of using compound tags, we'll use the {value} tag:
{value} will render in the document the text written in the title of the option. Therefore, in this case it is not necessary to use the opening and closing tags of each option, but only those of the field: {#field}{value}{/field}. We will place it where we want the selected option or options to appear.
2.1. Tag to add connectors to the values of a multiple choice field: {JOIN}
In the case of using {value} in a multiple choice field, we can use the {JOIN} tag to add punctuation:
{JOIN} acts as a connector and automatically understands the number of selected options. In the document, it will be replaced by the corresponding punctuation marks and conjunctions: (,), (;), (o), (and).
It is the evolution of the {link}, {linkTrim}, {linkSpec}, {linkChar} and {Connector} tags, which maintain their functions but have been left in the background due to the greater versatility of {JOIN}, which fulfills the mission of all of them.
Here are the steps to set option tags using {value} and {JOIN}:
- Write the opening and closing tags of the field in the corresponding place in the template.
- Add the {value} tag between the opening and closing tags.
- Include the {JOIN} tag right after the {value} one.
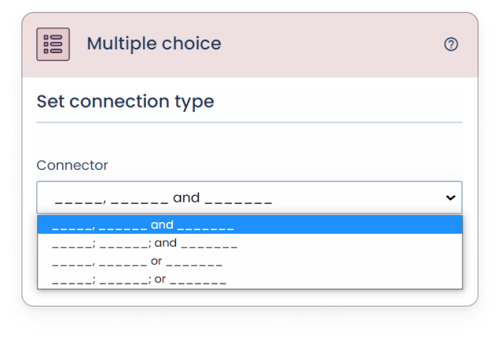
- After saving the changes, we will go to the advanced options section of the multiple choice field to choose the option of punctuation marks ("," or ";") and conjunctions ("and" or "or") desired for {JOIN}:
Although {JOIN} will cause the connectors to appear by default, we can also specify in which language we want them to be displayed.
Currently, the platform offers eight languages: English, Spanish, German, Austrian-German, Catalan, French, Italian and Portuguese. We will select the desired language within the same {JOIN} tag, adding an underscore and its language abbreviation:
English: {JOIN_EN}
Spanish: {JOIN_ES}
German: {JOIN_DE}
Austrian German: {JOIN_DE_AT}
Catalan: {JOIN_CA}
French: {JOIN_FR}
Italian: {JOIN_IT}
Portuguese: {JOIN_PT}
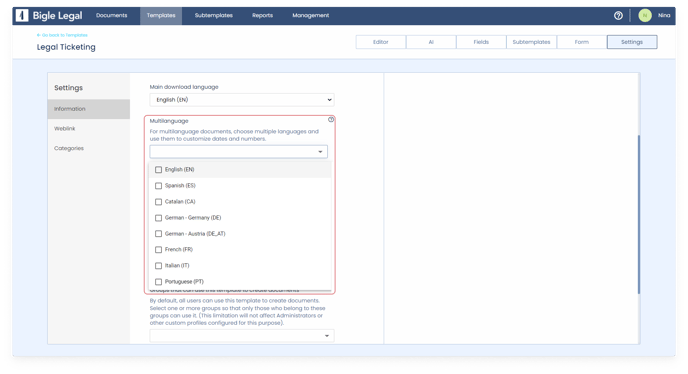
Then, for the platform to correctly identify the tags, we must select all the languages used through the "Multilanguage" dropdown, in the template/settings/information section:
Here are some possible structures with {value} and {JOIN}:
A. List in a sentence with connectors
{#field}{value}{JOIN}{/field}.
Result example:
Clause on the obligation to indemnify in case of infringement, Clause on the ownership of confidential information and Clause on the reproduction of confidential information.
B. Vertical list without connectors
{#field}
{value}{/field}
Result example:
Clause on obligation to indemnify in case of infringement
Clause on ownership of confidential information
Clause on the reproduction of confidential information
C. Vertical list with connectors
{#field}
{value}{JOIN}{/field}
Result example:
Clause on the obligation to indemnify in case of infringement,
Clause on ownership of confidential information and
Clause on the reproduction of confidential information
It is important to remember that, knowing the function of each tag and configuring them correctly, we can achieve an infinity of different results.
For example, we could even combine the use of the opening and closing compound tags with {value} so that the options appear in one part of the document and their titles or values appear in another part.
2.2. Tag to add automatic numbering to the values of a multiple choice field: {numbering}
By using {value} in a multiple choice field, we can have the selected options automatically numbered, thanks to the {numbering} tag.
We must place {numbering} in the place where we want the numbering to appear in the final document.
To achieve a result such as "(1) car (2) motorcycle (3) bicycle", in which the numbering appears in parentheses and just before each selected option, we will use the following configuration:
{#field}({numbering}) {value} {/field}
In either case, we'll need to make sure that both {numbering} and {value} are inside the field's opening and closing tags.
Numbering options
Once the tags are placed in the template, we will go to the advanced options of the configuration panel of the multiple choice field in question.
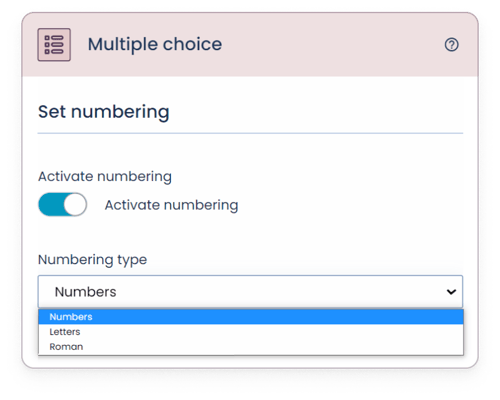
In the “Set numbering” section, we will first activate numbering and then select the desired option through the drop-down menu:
- Numbers: 1, 2, 3, 4, 5…
- Letters: a, b, c, d, e…
- Roman: I, II, III, IV, V…